Kosmos 2 Patch14 224
模型简介
Kosmos-2是一个视觉-语言模型,专注于图像描述生成和视觉接地任务。它能够理解图像内容并生成相关文本描述,同时还能将文本中的短语与图像中的特定区域关联起来。
模型特点
多模态接地能力
能够将文本中的短语与图像中的特定区域关联起来,实现精准的视觉定位
多模态指代理解
可以理解图像中的指代表达,并能生成描述图像区域的指代表达
多功能视觉-语言任务
支持多种视觉-语言任务,包括接地视觉问答、图像描述生成等
模型能力
图像描述生成
视觉接地
多模态指代理解
接地视觉问答
指代表达生成
使用案例
内容理解与生成
自动图像标注
为图像生成详细的文字描述
生成包含图像中主要对象和场景的描述文本
视觉问答系统
回答关于图像内容的特定问题
准确回答关于图像中对象位置和关系的问题
辅助技术
视觉辅助工具
为视障人士描述图像内容
提供详细的图像描述和对象位置信息
🚀 Kosmos-2:将多模态大语言模型与现实世界关联
Kosmos-2 是一个多模态大语言模型,能够处理图像和文本信息。它可以完成图像描述、视觉问答、多模态指称等多种任务,为图像理解和交互提供了强大的工具。
🚀 快速开始
此 Hub 仓库包含了来自微软的 原始 Kosmos-2 模型 的 HuggingFace transformers 实现。
使用以下代码开始使用该模型:
import requests
from PIL import Image
from transformers import AutoProcessor, AutoModelForVision2Seq
model = AutoModelForVision2Seq.from_pretrained("microsoft/kosmos-2-patch14-224")
processor = AutoProcessor.from_pretrained("microsoft/kosmos-2-patch14-224")
prompt = "<grounding>An image of"
url = "https://huggingface.co/microsoft/kosmos-2-patch14-224/resolve/main/snowman.png"
image = Image.open(requests.get(url, stream=True).raw)
# The original Kosmos-2 demo saves the image first then reload it. For some images, this will give slightly different image input and change the generation outputs.
image.save("new_image.jpg")
image = Image.open("new_image.jpg")
inputs = processor(text=prompt, images=image, return_tensors="pt")
generated_ids = model.generate(
pixel_values=inputs["pixel_values"],
input_ids=inputs["input_ids"],
attention_mask=inputs["attention_mask"],
image_embeds=None,
image_embeds_position_mask=inputs["image_embeds_position_mask"],
use_cache=True,
max_new_tokens=128,
)
generated_text = processor.batch_decode(generated_ids, skip_special_tokens=True)[0]
# Specify `cleanup_and_extract=False` in order to see the raw model generation.
processed_text = processor.post_process_generation(generated_text, cleanup_and_extract=False)
print(processed_text)
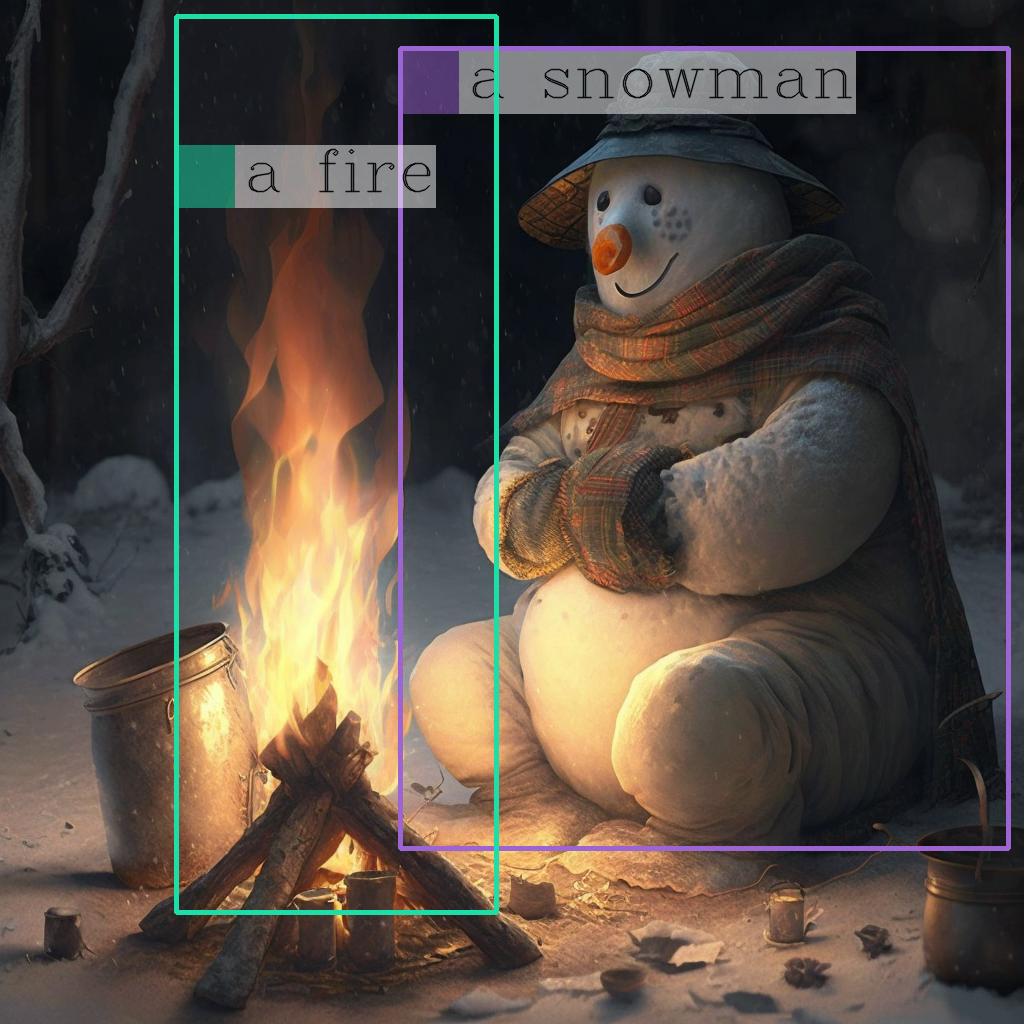
# `<grounding> An image of<phrase> a snowman</phrase><object><patch_index_0044><patch_index_0863></object> warming himself by<phrase> a fire</phrase><object><patch_index_0005><patch_index_0911></object>.`
# By default, the generated text is cleanup and the entities are extracted.
processed_text, entities = processor.post_process_generation(generated_text)
print(processed_text)
# `An image of a snowman warming himself by a fire.`
print(entities)
# `[('a snowman', (12, 21), [(0.390625, 0.046875, 0.984375, 0.828125)]), ('a fire', (41, 47), [(0.171875, 0.015625, 0.484375, 0.890625)])]`
✨ 主要特性
该模型能够通过改变提示来执行不同的任务:
- 多模态定位:包括短语定位和指代表达理解。
- 多模态指称:例如指代表达生成。
- 感知 - 语言任务:如基于定位的视觉问答。
- 基于定位的图像描述:提供简要和详细的图像描述。
💻 使用示例
基础用法
import requests

from PIL import Image
from transformers import AutoProcessor, AutoModelForVision2Seq


model = AutoModelForVision2Seq.from_pretrained("microsoft/kosmos-2-patch14-224")
processor = AutoProcessor.from_pretrained("microsoft/kosmos-2-patch14-224")

prompt = "<grounding>An image of"

url = "https://huggingface.co/microsoft/kosmos-2-patch14-224/resolve/main/snowman.png"
image = Image.open(requests.get(url, stream=True).raw)

# The original Kosmos-2 demo saves the image first then reload it. For some images, this will give slightly different image input and change the generation outputs.
image.save("new_image.jpg")
image = Image.open("new_image.jpg")

inputs = processor(text=prompt, images=image, return_tensors="pt")

generated_ids = model.generate(
    pixel_values=inputs["pixel_values"],
    input_ids=inputs["input_ids"],
    attention_mask=inputs["attention_mask"],
    image_embeds=None,
    image_embeds_position_mask=inputs["image_embeds_position_mask"],
    use_cache=True,
    max_new_tokens=128,
)
generated_text = processor.batch_decode(generated_ids, skip_special_tokens=True)[0]

# Specify `cleanup_and_extract=False` in order to see the raw model generation.
processed_text = processor.post_process_generation(generated_text, cleanup_and_extract=False)

print(processed_text)
# `<grounding> An image of<phrase> a snowman</phrase><object><patch_index_0044><patch_index_0863></object> warming himself by<phrase> a fire</phrase><object><patch_index_0005><patch_index_0911></object>.`

# By default, the generated  text is cleanup and the entities are extracted.
processed_text, entities = processor.post_process_generation(generated_text)

print(processed_text)
# `An image of a snowman warming himself by a fire.`

print(entities)
# `[('a snowman', (12, 21), [(0.390625, 0.046875, 0.984375, 0.828125)]), ('a fire', (41, 47), [(0.171875, 0.015625, 0.484375, 0.890625)])]`
高级用法
多模态定位
- 短语定位
prompt = "<grounding><phrase> a snowman</phrase>"
run_example(prompt)

# a snowman is warming himself by the fire
# [('a snowman', (0, 9), [(0.390625, 0.046875, 0.984375, 0.828125)]), ('the fire', (32, 40), [(0.203125, 0.015625, 0.453125, 0.859375)])]

# <grounding><phrase> a snowman</phrase><object><patch_index_0044><patch_index_0863></object> is warming himself by<phrase> the fire</phrase><object><patch_index_0006><patch_index_0878></object>
- 指代表达理解
prompt = "<grounding><phrase> a snowman next to a fire</phrase>"
run_example(prompt)

# a snowman next to a fire
# [('a snowman next to a fire', (0, 24), [(0.390625, 0.046875, 0.984375, 0.828125)])]

# <grounding><phrase> a snowman next to a fire</phrase><object><patch_index_0044><patch_index_0863></object>
多模态指称
- 指代表达生成
prompt = "<grounding><phrase> It</phrase><object><patch_index_0044><patch_index_0863></object> is"
run_example(prompt)

# It is snowman in a hat and scarf
# [('It', (0, 2), [(0.390625, 0.046875, 0.984375, 0.828125)])]

# <grounding><phrase> It</phrase><object><patch_index_0044><patch_index_0863></object> is snowman in a hat and scarf
感知 - 语言任务
- 基于定位的视觉问答
prompt = "<grounding> Question: What is special about this image? Answer:"
run_example(prompt)

# Question: What is special about this image? Answer: The image features a snowman sitting by a campfire in the snow.
# [('a snowman', (71, 80), [(0.390625, 0.046875, 0.984375, 0.828125)]), ('a campfire', (92, 102), [(0.109375, 0.640625, 0.546875, 0.984375)])]

# <grounding> Question: What is special about this image? Answer: The image features<phrase> a snowman</phrase><object><patch_index_0044><patch_index_0863></object> sitting by<phrase> a campfire</phrase><object><patch_index_0643><patch_index_1009></object> in the snow.
- 基于边界框的多模态指称的视觉问答
prompt = "<grounding> Question: Where is<phrase> the fire</phrase><object><patch_index_0005><patch_index_0911></object> next to? Answer:"
run_example(prompt)

# Question: Where is the fire next to? Answer: Near the snowman.
# [('the fire', (19, 27), [(0.171875, 0.015625, 0.484375, 0.890625)]), ('the snowman', (50, 61), [(0.390625, 0.046875, 0.984375, 0.828125)])]

# <grounding> Question: Where is<phrase> the fire</phrase><object><patch_index_0005><patch_index_0911></object> next to? Answer: Near<phrase> the snowman</phrase><object><patch_index_0044><patch_index_0863></object>.
基于定位的图像描述
- 简要描述
prompt = "<grounding> An image of"
run_example(prompt)

# An image of a snowman warming himself by a campfire.
# [('a snowman', (12, 21), [(0.390625, 0.046875, 0.984375, 0.828125)]), ('a campfire', (41, 51), [(0.109375, 0.640625, 0.546875, 0.984375)])]

# <grounding> An image of<phrase> a snowman</phrase><object><patch_index_0044><patch_index_0863></object> warming himself by<phrase> a campfire</phrase><object><patch_index_0643><patch_index_1009></object>.
- 详细描述
prompt = "<grounding> Describe this image in detail:"
run_example(prompt)

# Describe this image in detail: The image features a snowman sitting by a campfire in the snow. He is wearing a hat, scarf, and gloves, with a pot nearby and a cup nearby. The snowman appears to be enjoying the warmth of the fire, and it appears to have a warm and cozy atmosphere.
# [('a campfire', (71, 81), [(0.171875, 0.015625, 0.484375, 0.984375)]), ('a hat', (109, 114), [(0.515625, 0.046875, 0.828125, 0.234375)]), ('scarf', (116, 121), [(0.515625, 0.234375, 0.890625, 0.578125)]), ('gloves', (127, 133), [(0.515625, 0.390625, 0.640625, 0.515625)]), ('a pot', (140, 145), [(0.078125, 0.609375, 0.265625, 0.859375)]), ('a cup', (157, 162), [(0.890625, 0.765625, 0.984375, 0.984375)])]

# <grounding> Describe this image in detail: The image features a snowman sitting by<phrase> a campfire</phrase><object><patch_index_0005><patch_index_1007></object> in the snow. He is wearing<phrase> a hat</phrase><object><patch_index_0048><patch_index_0250></object>,<phrase> scarf</phrase><object><patch_index_0240><patch_index_0604></object>, and<phrase> gloves</phrase><object><patch_index_0400><patch_index_0532></object>, with<phrase> a pot</phrase><object><patch_index_0610><patch_index_0872></object> nearby and<phrase> a cup</phrase><object><patch_index_0796><patch_index_1023></object> nearby. The snowman appears to be enjoying the warmth of the fire, and it appears to have a warm and cozy atmosphere.
🔧 绘制图像上实体的边界框
一旦你获得了 entities,可以使用以下辅助函数在图像上绘制它们的边界框:
import cv2
import numpy as np
import os
import requests
import torch
import torchvision.transforms as T

from PIL import Image


def is_overlapping(rect1, rect2):
    x1, y1, x2, y2 = rect1
    x3, y3, x4, y4 = rect2
    return not (x2 < x3 or x1 > x4 or y2 < y3 or y1 > y4)


def draw_entity_boxes_on_image(image, entities, show=False, save_path=None):
    """_summary_
    Args:
        image (_type_): image or image path
        collect_entity_location (_type_): _description_
    """
    if isinstance(image, Image.Image):
        image_h = image.height
        image_w = image.width
        image = np.array(image)[:, :, [2, 1, 0]]
    elif isinstance(image, str):
        if os.path.exists(image):
            pil_img = Image.open(image).convert("RGB")
            image = np.array(pil_img)[:, :, [2, 1, 0]]
            image_h = pil_img.height
            image_w = pil_img.width
        else:
            raise ValueError(f"invaild image path, {image}")
    elif isinstance(image, torch.Tensor):
        image_tensor = image.cpu()
        reverse_norm_mean = torch.tensor([0.48145466, 0.4578275, 0.40821073])[:, None, None]
        reverse_norm_std = torch.tensor([0.26862954, 0.26130258, 0.27577711])[:, None, None]
        image_tensor = image_tensor * reverse_norm_std + reverse_norm_mean
        pil_img = T.ToPILImage()(image_tensor)
        image_h = pil_img.height
        image_w = pil_img.width
        image = np.array(pil_img)[:, :, [2, 1, 0]]
    else:
        raise ValueError(f"invaild image format, {type(image)} for {image}")

    if len(entities) == 0:
        return image

    new_image = image.copy()
    previous_bboxes = []
    # size of text
    text_size = 1
    # thickness of text
    text_line = 1  # int(max(1 * min(image_h, image_w) / 512, 1))
    box_line = 3
    (c_width, text_height), _ = cv2.getTextSize("F", cv2.FONT_HERSHEY_COMPLEX, text_size, text_line)
    base_height = int(text_height * 0.675)
    text_offset_original = text_height - base_height
    text_spaces = 3

    for entity_name, (start, end), bboxes in entities:
        for (x1_norm, y1_norm, x2_norm, y2_norm) in bboxes:
            orig_x1, orig_y1, orig_x2, orig_y2 = int(x1_norm * image_w), int(y1_norm * image_h), int(x2_norm * image_w), int(y2_norm * image_h)
            # draw bbox
            # random color
            color = tuple(np.random.randint(0, 255, size=3).tolist())
            new_image = cv2.rectangle(new_image, (orig_x1, orig_y1), (orig_x2, orig_y2), color, box_line)

            l_o, r_o = box_line // 2 + box_line % 2, box_line // 2 + box_line % 2 + 1

            x1 = orig_x1 - l_o
            y1 = orig_y1 - l_o

            if y1 < text_height + text_offset_original + 2 * text_spaces:
                y1 = orig_y1 + r_o + text_height + text_offset_original + 2 * text_spaces
                x1 = orig_x1 + r_o

            # add text background
            (text_width, text_height), _ = cv2.getTextSize(f"  {entity_name}", cv2.FONT_HERSHEY_COMPLEX, text_size, text_line)
            text_bg_x1, text_bg_y1, text_bg_x2, text_bg_y2 = x1, y1 - (text_height + text_offset_original + 2 * text_spaces), x1 + text_width, y1

            for prev_bbox in previous_bboxes:
                while is_overlapping((text_bg_x1, text_bg_y1, text_bg_x2, text_bg_y2), prev_bbox):
                    text_bg_y1 += (text_height + text_offset_original + 2 * text_spaces)
                    text_bg_y2 += (text_height + text_offset_original + 2 * text_spaces)
                    y1 += (text_height + text_offset_original + 2 * text_spaces)

                    if text_bg_y2 >= image_h:
                        text_bg_y1 = max(0, image_h - (text_height + text_offset_original + 2 * text_spaces))
                        text_bg_y2 = image_h
                        y1 = image_h
                        break

            alpha = 0.5
            for i in range(text_bg_y1, text_bg_y2):
                for j in range(text_bg_x1, text_bg_x2):
                    if i < image_h and j < image_w:
                        if j < text_bg_x1 + 1.35 * c_width:
                            # original color
                            bg_color = color
                        else:
                            # white
                            bg_color = [255, 255, 255]
                        new_image[i, j] = (alpha * new_image[i, j] + (1 - alpha) * np.array(bg_color)).astype(np.uint8)

            cv2.putText(
                new_image, f"  {entity_name}", (x1, y1 - text_offset_original - 1 * text_spaces), cv2.FONT_HERSHEY_COMPLEX, text_size, (0, 0, 0), text_line, cv2.LINE_AA
            )
            # previous_locations.append((x1, y1))
            previous_bboxes.append((text_bg_x1, text_bg_y1, text_bg_x2, text_bg_y2))

    pil_image = Image.fromarray(new_image[:, :, [2, 1, 0]])
    if save_path:
        pil_image.save(save_path)
    if show:
        pil_image.show()

    return new_image


# (The same image from the previous code example)
url = "https://huggingface.co/microsoft/kosmos-2-patch14-224/resolve/main/snowman.png"
image = Image.open(requests.get(url, stream=True).raw)

# From the previous code example
entities = [('a snowman', (12, 21), [(0.390625, 0.046875, 0.984375, 0.828125)]), ('a fire', (41, 47), [(0.171875, 0.015625, 0.484375, 0.890625)])]

# Draw the bounding bboxes
draw_entity_boxes_on_image(image, entities, show=True)
以下是带有注释的图像:
📚 详细文档
BibTex 和引用信息
@article{kosmos-2,
  title={Kosmos-2: Grounding Multimodal Large Language Models to the World},
  author={Zhiliang Peng and Wenhui Wang and Li Dong and Yaru Hao and Shaohan Huang and Shuming Ma and Furu Wei},
  journal={ArXiv},
  year={2023},
  volume={abs/2306}
}

@article{kosmos-1,
  title={Language Is Not All You Need: Aligning Perception with Language Models},
  author={Shaohan Huang and Li Dong and Wenhui Wang and Yaru Hao and Saksham Singhal and Shuming Ma and Tengchao Lv and Lei Cui and Owais Khan Mohammed and Qiang Liu and Kriti Aggarwal and Zewen Chi and Johan Bjorck and Vishrav Chaudhary and Subhojit Som and Xia Song and Furu Wei},
  journal={ArXiv},
  year={2023},
  volume={abs/2302.14045}
}

@article{metalm,
  title={Language Models are General-Purpose Interfaces},
  author={Yaru Hao and Haoyu Song and Li Dong and Shaohan Huang and Zewen Chi and Wenhui Wang and Shuming Ma and Furu Wei},
  journal={ArXiv},
  year={2022},
  volume={abs/2206.06336}
}
📄 许可证
本项目采用 MIT 许可证。
Clip Vit Large Patch14
CLIP是由OpenAI开发的视觉-语言模型,通过对比学习将图像和文本映射到共享的嵌入空间,支持零样本图像分类
图像生成文本
C
openai
44.7M
1,710
Clip Vit Base Patch32
CLIP是由OpenAI开发的多模态模型,能够理解图像和文本之间的关系,支持零样本图像分类任务。
图像生成文本
C
openai
14.0M
666
Siglip So400m Patch14 384
Apache-2.0
SigLIP是基于WebLi数据集预训练的视觉语言模型,采用改进的sigmoid损失函数,优化了图像-文本匹配任务。
图像生成文本 Transformers
S
google
6.1M
526
Clip Vit Base Patch16
CLIP是由OpenAI开发的多模态模型,通过对比学习将图像和文本映射到共享的嵌入空间,实现零样本图像分类能力。
图像生成文本
C
openai
4.6M
119
Blip Image Captioning Base
Bsd-3-clause
BLIP是一个先进的视觉-语言预训练模型,擅长图像描述生成任务,支持条件式和非条件式文本生成。
图像生成文本 Transformers
B
Salesforce
2.8M
688
Blip Image Captioning Large
Bsd-3-clause
BLIP是一个统一的视觉-语言预训练框架,擅长图像描述生成任务,支持条件式和无条件式图像描述生成。
图像生成文本 Transformers
B
Salesforce
2.5M
1,312
Openvla 7b
MIT
OpenVLA 7B是一个基于Open X-Embodiment数据集训练的开源视觉-语言-动作模型,能够根据语言指令和摄像头图像生成机器人动作。
图像生成文本 Transformers 英语
O
openvla
1.7M
108
Llava V1.5 7b
LLaVA 是一款开源多模态聊天机器人,基于 LLaMA/Vicuna 微调,支持图文交互。
图像生成文本 Transformers
L
liuhaotian
1.4M
448
Vit Gpt2 Image Captioning
Apache-2.0
这是一个基于ViT和GPT2架构的图像描述生成模型,能够为输入图像生成自然语言描述。
图像生成文本 Transformers
V
nlpconnect
939.88k
887
Blip2 Opt 2.7b
MIT
BLIP-2是一个视觉语言模型,结合了图像编码器和大型语言模型,用于图像到文本的生成任务。
图像生成文本 Transformers 英语
B
Salesforce
867.78k
359
精选推荐AI模型
Llama 3 Typhoon V1.5x 8b Instruct
专为泰语设计的80亿参数指令模型,性能媲美GPT-3.5-turbo,优化了应用场景、检索增强生成、受限生成和推理任务
大型语言模型 Transformers 支持多种语言
L
scb10x
3,269
16
Cadet Tiny
Openrail
Cadet-Tiny是一个基于SODA数据集训练的超小型对话模型,专为边缘设备推理设计,体积仅为Cosmo-3B模型的2%左右。
对话系统 Transformers 英语
C
ToddGoldfarb
2,691
6
Roberta Base Chinese Extractive Qa
基于RoBERTa架构的中文抽取式问答模型,适用于从给定文本中提取答案的任务。
问答系统 中文
R
uer
2,694
98
%20--%3e%3cdefs%3e%3cstyle%3e%20.st0%20{%20fill:%20%23061b40;%20}%20.st1%20{%20fill:%20%23306af1;%20}%20.st2%20{%20fill:%20%235ce5cf;%20}%20%3c/style%3e%3c/defs%3e%3cg%3e%3cpath%20class='st0'%20d='M55,10.5h9v3h-9v9h12V7.5h-12v3ZM64,19.5h-6v-3h6v3Z'/%3e%3cpolygon%20class='st0'%20points='69%2016.5%2078%2016.5%2078%2019.5%2069%2019.5%2069%2022.5%2081%2022.5%2081%2013.5%2072%2013.5%2072%2010.5%2081%2010.5%2081%207.5%2069%207.5%2069%2016.5'/%3e%3cpolygon%20class='st0'%20points='95%2010.5%2095%207.5%2083%207.5%2083%2022.5%2095%2022.5%2095%2019.5%2086%2019.5%2086%2016.5%2095%2016.5%2095%2013.5%2086%2013.5%2086%2010.5%2095%2010.5'/%3e%3cpath%20class='st0'%20d='M40,1.5v21h11.6l1.4-1.4v-7.6h0c0,0-1.4-1.5-1.4-1.5l1.4-1.4V2.9l-1.4-1.4h-11.6ZM50,19.5h-7v-6h7v6ZM50,10.5h-7v-6h7v6Z'/%3e%3c/g%3e%3cpath%20class='st1'%20d='M23.1,24L14.7,4.8l-4.9,11.2h3.8l-1.8,4H3.3L12.1,0H2C.9,0,0,.9,0,2v20c0,1.1.9,2,2,2h21.1Z'/%3e%3cpath%20class='st2'%20d='M34,0h-16.8l10.6,24h6.2c1.1,0,2-.9,2-2V2C36,.9,35.1,0,34,0ZM32.5,20h-4V4h4v16Z'/%3e%3c/svg%3e)
智启未来,您的人工智能解决方案智库
简体中文